Make a Zip Disk bootable
If you install your Zip Drive following the recommended procedure you will
not be able to boot from it. This is not a limitation of the drive
itself, but rather a feature of the way HiSoft have decided to handle the
problem of removable media on the Amiga.
The Amiga has no Graphical Interface for mounting and unmounting Removable
Media. This means that in order to mount an removable device on the
workbench you must either use a public domain program such as SCSI-Probe,
or use the command line to issue "mount" and "diskchange" commands. If you
keep swapping between removable disks frequently this can become a real
pain. HiSoft have circumvented this problem by letting the Zip Tools utility
handle all Zip Disk operations.
Occasionally though, you may want to have the option to boot from a Zip
Disk. For example if you back up your operating system onto a Zip Disk it
would be nice to be able to boot from it in case of an emergency. Fortunatly
this is infact very easy to achieve.
All that is required is to install a bootable filesystem on the Zip
Disk in question. Normally I would recommed using HDToolKit to do this,
however it seems to have problems working out exactly what a Zip Disk is. If
you do use HDToolKit to partition your first disk you will probably find it
has a capacity of only 20 Megabytes.
Instead of using HDToolKit we'll use RDPrep which is available on tahe Aminet
and was also on Amiga Format CD14 for those of you who read it.
The first step with RDPrep is to tell it which device your disk is attached
by. Normally this is the scsi.device, but if you have a 3rd party SCSI
controller it may be different. (i.e. gvpscsi.device for GVP users)
This is achieved by adding the
line
DEVICE=scsi.device
into the tool types.
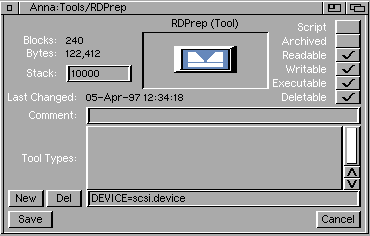
If you've never done this before, single click on the icon for RDPrep and
select Information.. from the icons menu. You will be presented with the
following screen.

Click on the "New" box near the bottom right hand side and
enter "DEVICE=scsi.device" into the text gadgit on the right. Then click on
save to make the changes permanant.
Upon launching RDPrep you will be presented with a screen similar to the
following...

Select the Zip Drive from the list of drives available and hit the button
near the top to take you to screen 2.
When you get to screen 2, click on the button "go to Complex Mode" near the
top right of the screen. You will presented with a screen somthing like
this...

You only need to check 3 things. Most importantly check that the options
"Mount" and "Bootable" are both set to yes.
You may also want to change the device name as RDPrep defaults to EH0. Be carefull not to give the disk a device name of ZIP0 as this is used by the HiSoft Zip Tools Software for mounting conventionally formatted Zip Disks.
Finally you can split the disk up into more than one partition should you wish. However this is not recommended.
Finally you may want to change the boot priority. Currently it is set to 1.
This means that your Amiga will boot from this Zip Disk instead of the Hard
Drive if it is given the chance. However it will still boot from the floppy
in preference to both. A negative boot priority will mean that your Amiga
will always boot from your hard drive in preference to this Zip
Disk.
Go back to screen one, which will have changed slightly to include some
information about the disk you have just edited...

Click on the "Write RDB" button to write the changes to the disk.
You will now need to format your Zip Disk using workbench. If you have the
ZIPO Dos Driver installed on your system (necessary for normal Zip
operation) your Zip Disk will now show up as ZIPO:NDOS as well. This entry
is caused by Zip Tools not expecting you to format a Zip Disk as a mountable
AmigaDos disk. It can be safely ignored. As long as you don't install Zip
Tools on this cartridge this icon will not appear when you boot from the Zip
Drive.
All that remains now if for you to copy Workbench and any data onto the Zip
Disk.


